Assume the following scenario:
- One installs a Network Device Enrollment Service (NDES) server.
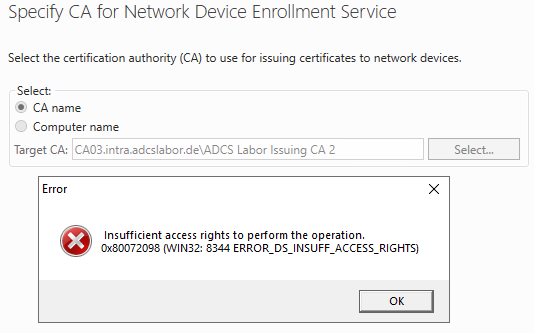
- The role configuration fails with the following error message:
Insufficient access rights to perform this operation. 0x80072098 (WIN32: 8344 ERROR_DS_INSUFF_ACCESS_RIGHTS
Typically, the NDES roll configuration requires, that the installing user is a member of the Enterprise Admins group. However, this is not technically necessary and contradicts Microsoft's security hardening recommendations, since NDES is not (necessarily) a system that is assigned to the highest security layer (Tier-0).
Below is a way to configure the NDES role even without the required permissions.
The Network Device Enrollment Service (NDES) provides a way for devices that do not have an identifier in Active Directory (for example, network devices such as routers, switches, printers, thin clients, or smartphones and tablets) to request certificates from a certification authority. For a more detailed description, see the article "Network Device Enrollment Service (NDES) Basics„.
The configuration described here works in practice, but has not been tested by the manufacturer (Microsoft) and is therefore not officially supported.
This method is also suitable for using an NDES server with a third-party certificate authority (e.g., to enable the use of the Intune Connector for NDES with it) if it provides an appropriate interface for requesting certificates via DCOM.
The following method offers some advantages over the original one:
- Thus, installing the NDES role does not require elevated privileges. Thus, it is not necessary to log in to the NDES server with highly privileged accounts to install the role, which reduces the attack surface, especially for credential theft. Likewise, the PKI team can perform the installation on their own.
- Directly security hardened Registration Authority (RA) certificates can be used.
- The original NDES installation routine restarts the certification authority service, which does not always work reliably, depending on the Audit settings and Hardware security module used. This process can be controlled by the manual installation.
Implementation
Do you know TameMyCerts? TameMyCerts is an add-on for the Microsoft certification authority (Active Directory Certificate Services). It extends the function of the certification authority and enables the Application of regulationsto realize the secure automation of certificate issuance. TameMyCerts is unique in the Microsoft ecosystem, has already proven itself in countless companies around the world and is available under a free license. It can downloaded via GitHub and can be used free of charge. Professional maintenance is also offered.
Configure target certification authority
On the target certification authority, three values must be added to the SubjectTemplate configuration setting:
- UnstructuredName
- UnstructuredAddress
- DeviceSerialNumber
This can be done with the following command line commands.
certutil -setreg CA\SubjectTemplate +UnstructuredName
certutil -setreg CA\SubjectTemplate +UnstructuredAddress
certutil -setreg CA\SubjectTemplate +DeviceSerialNumber
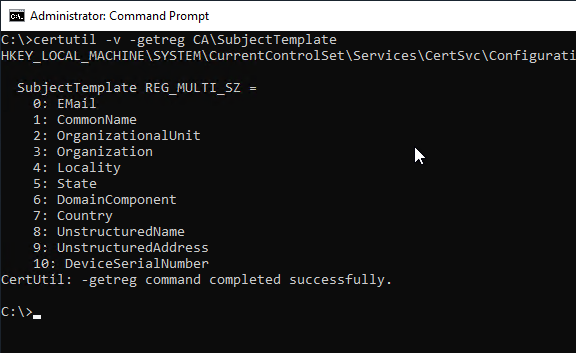
Afterwards, the certification authority service must be restarted.
Provide certificate templates
On the target certification authority, the following certificate templates must be configured and activated for application:
- The templates for the Registration Authority (RA) certificates. How to configure them is described in the article "Using custom Registration Authority (RA) certificate templates for the Network Device Enrollment Service (NDES)." described.
- The template for the device certificates. How to configure them is described in the article "Configure Device Template for Network Device Enrollment Service (NDES)" described.
If the device template is not published, no one-time passwords are generated. When the administration web page is called up, the error message "You do not have sufficient permission to enroll with SCEP. Please contact your system administrator.„.
Install binaries for NDES
If not already done, the first part of the NDES installation must be done on the target NDES server so that the required files are in place:
Add-WindowsFeature Web-Server -IncludeManagementTools
Add-WindowsFeature ADCS-Device-Enrollment -IncludeManagementTools
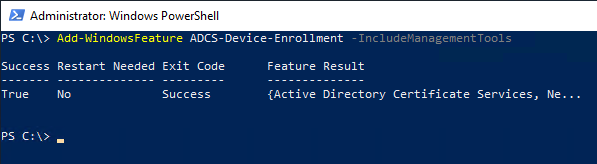
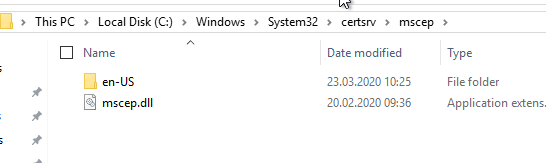
The NDES binaries can then be found in C:\Windows\System32\certsrv\mscep.
Import IIS configuration
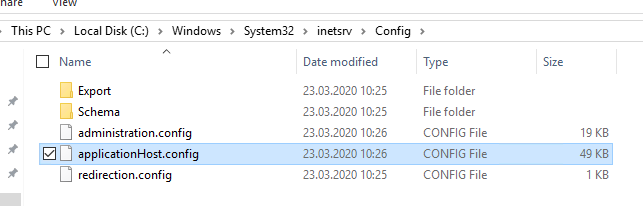
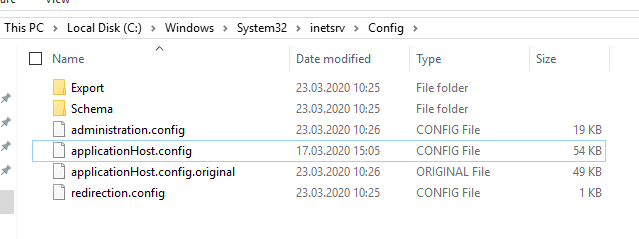
The NDES application is bound to the default web page in IIS via the C:\Windows\System32\inetsrv\Config\applicationHost.config file. This file must be copied from a system on which NDES is installed (for example, from a test environment) and replaced.
See the links below for an appropriately customized file.
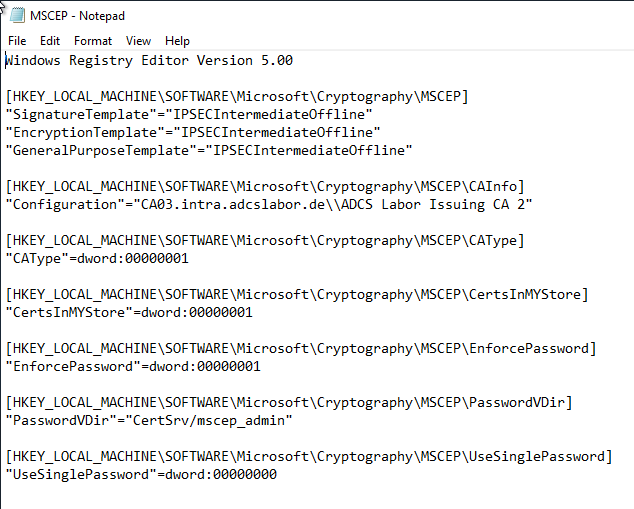
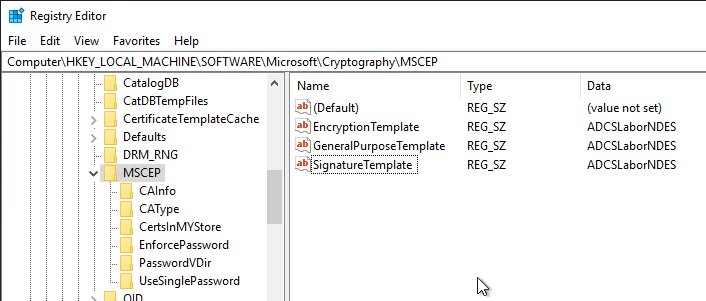
Importing the NDES Registry
Then the registry is imported from a system on which NDES is installed. The registry settings for NDES are located in the following path:
HKEY_LOCAL_MACHINE\SOFTWARE\Microsoft\Cryptography\MSCEP
You can find a sample file here. The file contains the CA configuration string, which must be adapted to your own environment.
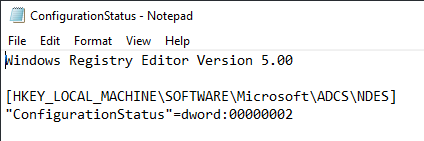
Notify Server Manager that the installation is complete
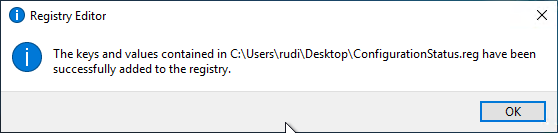
The Server Manager is then notified that the NDES role has been successfully installed. This setting is located under the following registry path:
[HKEY_LOCAL_MACHINE\SOFTWARE\Microsoft\ADCS\NDES]
"ConfigurationStatus"=dword:00000002
An example registry file is located here.
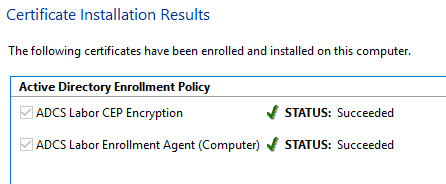
Now the two Registration Authority certificates must be applied for. For this purpose, you have to configure your own certificate templates. How this is done is described in the article "Using custom Registration Authority (RA) certificate templates for the Network Device Enrollment Service (NDES)." described.
Applying for the Registration Authority certificates
Please note: The Registration Authority certificates must be issued by the same certificate authority that the NDES server will subsequently address. If multiple certificate authorities provide the certificate templates for the Registration Authority certificates, a certificate authority will be randomly selected when a certificate request is made through the Microsoft Management Console (MMC) and the certificates will potentially be issued by the wrong one.
Then the two certificates must be requested in the computer certificate store.
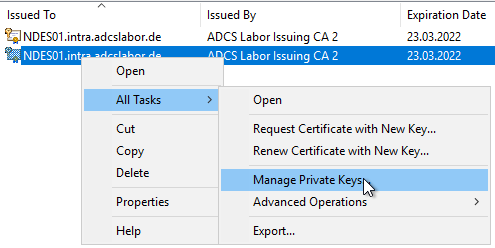
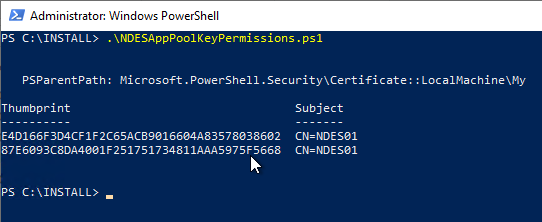
Set permissions on private keys
Now the permissions on the private keys of the certificates have to be adjusted so that the NDES service account has read access to the keys.
If a domain account is used, the permissions on the private keys should be configured directly via the certificate template. If this has not been done, the permissions can be set manually via the computer certificate management console (certlm.msc). To do this, right-click on the two certificates and select "All Tasks" - "Manage Private Keys".
The corresponding service account needs "Read" permission on the private key.
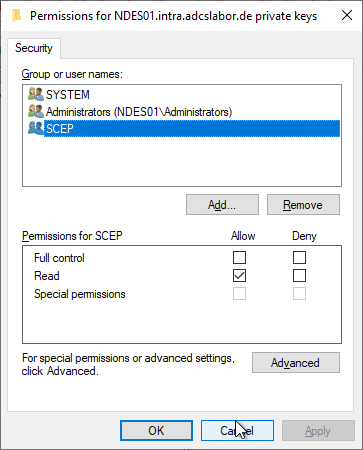
Unfortunately, you cannot configure the SCEP IIS application pool identity from the Certificate Management Console. However, one can find here a PowerShell script with which this can be done.
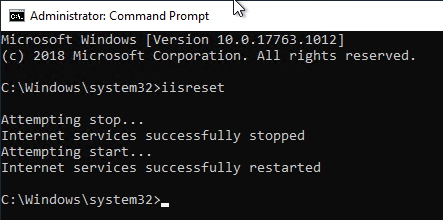
Afterwards the NDES configuration can be read in with the iisreset command.
iisreset
Rework
For the NDES administration web page, it is imperative to configure and enforce the use of Secure Sockets Layer (SSL) to prevent readout of transmitted credentials. See article "Enabling Secure Sockets Layer (SSL) for the Network Device Enrollment Service (NDES).„.
Other customizations, such as the certificate template to be applied for, can be made in the NDES Registry. Possible changes could be:
- Disabling NTLM and enforcing Kerberos at the Network Device Enrollment Service (NDES) administration web page.
- Enabling Basic Authentication for the Network Device Enrollment Service (NDES)
- Configure the number of passwords in circulation at the same time.
- Configure NDES to work with a static password.
- Configure NDES for operation without password.
- Configure NDES for operation with a Group Managed Service Account (gMSA).
- Configuring the Network Device Enrollment Service (NDES) for use with an alias.
After changing the registry settings, an iisreset command is required again.
Function test
After the installation has been completed, a comprehensive function test should be carried out. The procedure for this is described in the article "Performing a functional test for the network device registration service (NDES)" described.
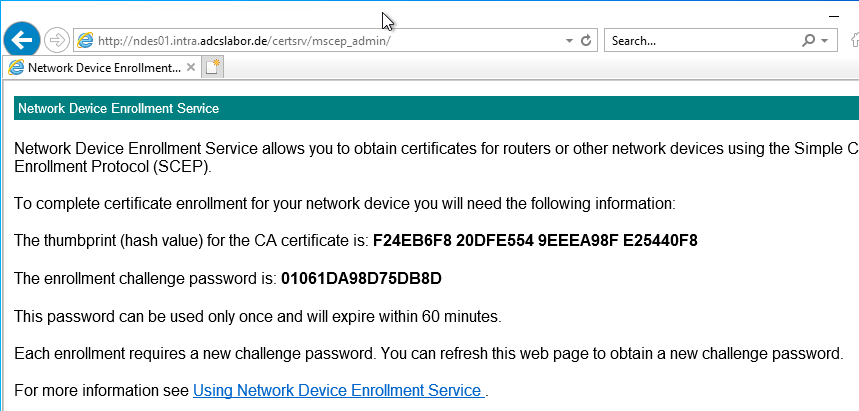
The NDES service should now be accessible at the following two addresses:
- http://{name-of-NDES-server}/certsrv/mscep
- http://{name-of-NDES-server}/certsrv/mscep_admin
Related links:
- Using custom Registration Authority (RA) certificate templates for the Network Device Enrollment Service (NDES).
- Enabling Secure Sockets Layer (SSL) for the Network Device Enrollment Service (NDES).
- Network Device Enrollment Service (NDES) Basics
- Certificate Enrollment for Windows Systems via the Network Device Enrollment Service (NDES) with Windows PowerShell
Comments are closed.